

How to Change DNS on Windows
- sales12669
- Jul 25
- 4 min read
Updated: 7 days ago
Key Takeaways:
Manual DNS configuration is useful for testing, troubleshooting, or improving internet performance.
DNS changes can be made through Control Panel, Settings, or PowerShell depending on preference and environment.
PowerShell is ideal for automation or repeated changes across multiple machines.
In domain environments, manual DNS changes may affect access to resources, so caution is important.
Learn how to change DNS on Windows, using either the GUI or command-line with PowerShell.
The most common scenario on enterprise computers is for DNS addresses to be handled by either DHCP servers or another IP address management solution. If you have not needed to change this configuration on one or more computers in a while, this guide will help refresh your memory. I will cover both Windows client and server operating systems.
For this guide, I demonstrate how to manually assign alternate DNS settings. Using DHCP to manage DNS is outside the scope of this article.
How to change DNS on Windows 10
What if you could change how your Windows 10 device finds every website with just a few clicks? The steps below show the most common ways to modify DNS settings manually.
Pros and cons of each method Using Control Panel
I am on my Windows 10 client machine. Let me click the Start button, type “control,” then select Control Panel.

Your Control Panel view may differ, but you can locate the Network and Sharing Center or Network Connections.

Look for your primary connection. It is often the one on the domain network, meaning the network adapter is associated with the computer’s domain membership.
Click the Ethernet or Wi-Fi link next to Connections, or select Change adapter settings on the left.
Select Properties at the bottom.
Then select Internet Protocol Version 4 (TCP/IPv4) and click Properties again.

This system already has a manually assigned IP configuration. If I wanted to test a specific website or internet-based app, instead of relying on my domain’s DNS servers, I could manually change the DNS to Google Public DNS (8.8.8.8).

That completes the process.
Using PowerShell
If you prefer command-line tools, here is how to view and change DNS settings using PowerShell. Open your preferred terminal and run this command to view the current configuration:
Get-DnsClientServerAddress

To remove the second DNS entry and change the first entry to 8.8.8.8, use the following command. Run PowerShell as an administrator.
Set-DNSClientServerAddress -InterfaceIndex 7 -ServerAddresses 8.8.8.8

Run Get-DnsClientServerAddress again to confirm the change.
How to change DNS on Windows 11
What if Windows 11 gave you an even easier way to adjust DNS settings? Let’s walk through the options.
Using Windows Settings
Open Start → Settings → Network & internet.

Select the Properties link.
You can view your IPv4 DNS servers in the middle of the screen.
Select Edit to adjust the values.
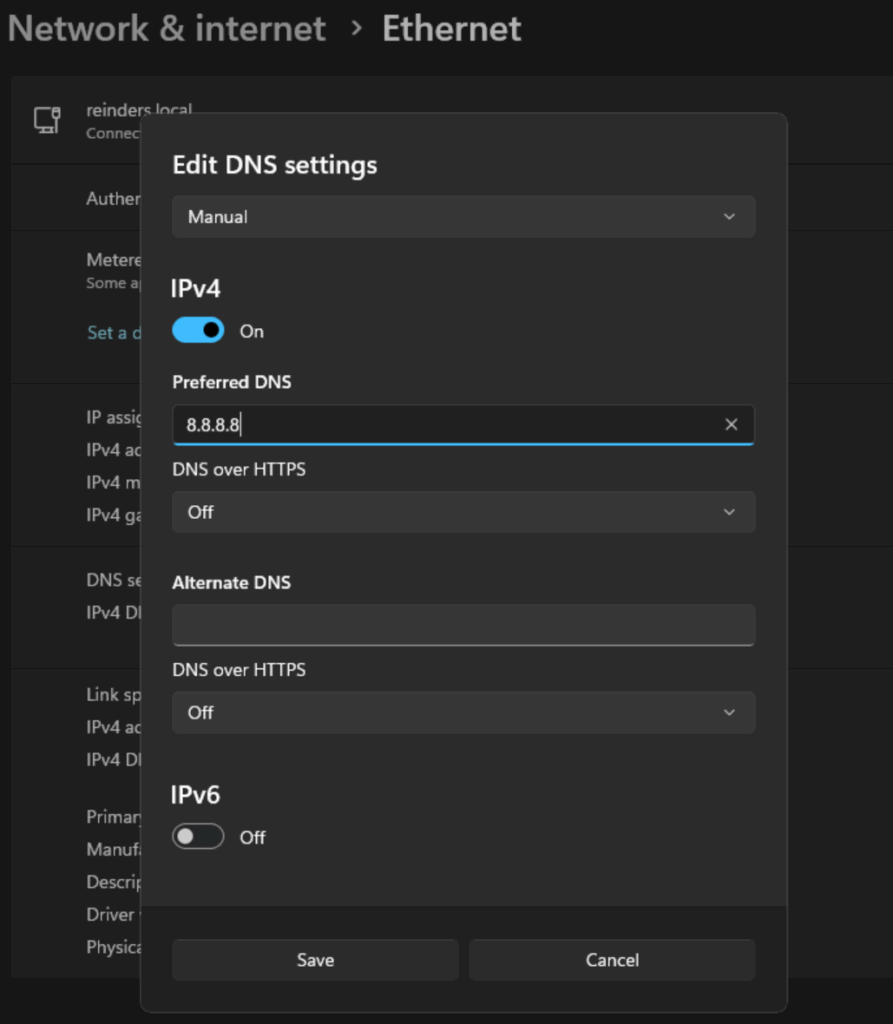
Change the DNS server to 8.8.8.8 and save.
Using PowerShell
We can use the same cmdlets that work on Windows 10.
Get-DnsClientServerAddress
This displays both IPv4 and IPv6 DNS settings.
To change to Google’s DNS server:
Set-DnsClientServerAddress -InterfaceIndex 12 -ServerAddresses 8.8.8.8

Run Get-DnsClientServerAddress again to confirm.
How to change DNS on Windows Server (Core)
What if server environments handled DNS changes just as easily? Fortunately, they do. Here are the methods for Windows Server.
Using SConfig (Windows Server Core)
On Windows Server installations with Server Core, you can adjust DNS settings using SConfig.
On the main menu, select option 8 for Network settings.
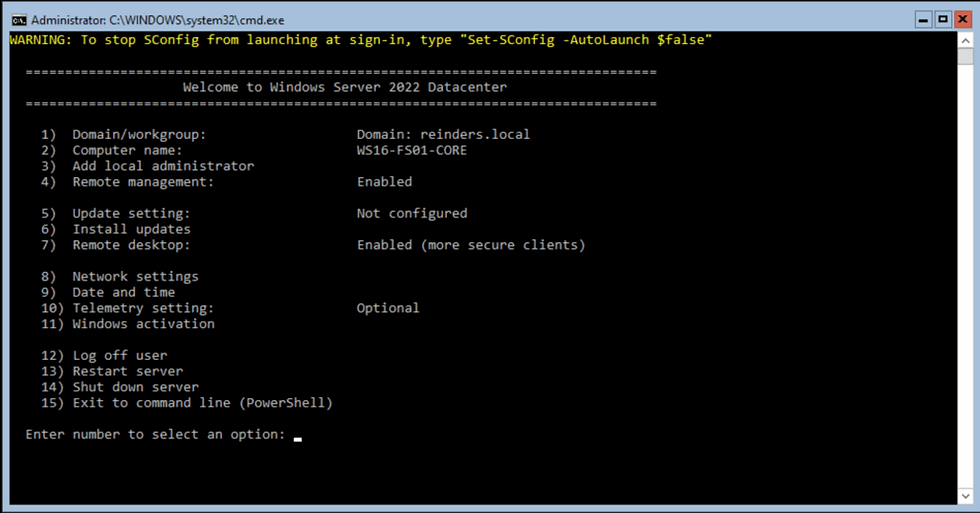
I will choose index 1 because it is my only network adapter.

This view shows familiar settings including IP addresses and DNS server entries.
Choose option 2 to adjust DNS servers.

After making the changes, I reselected option 8 to verify the updates.
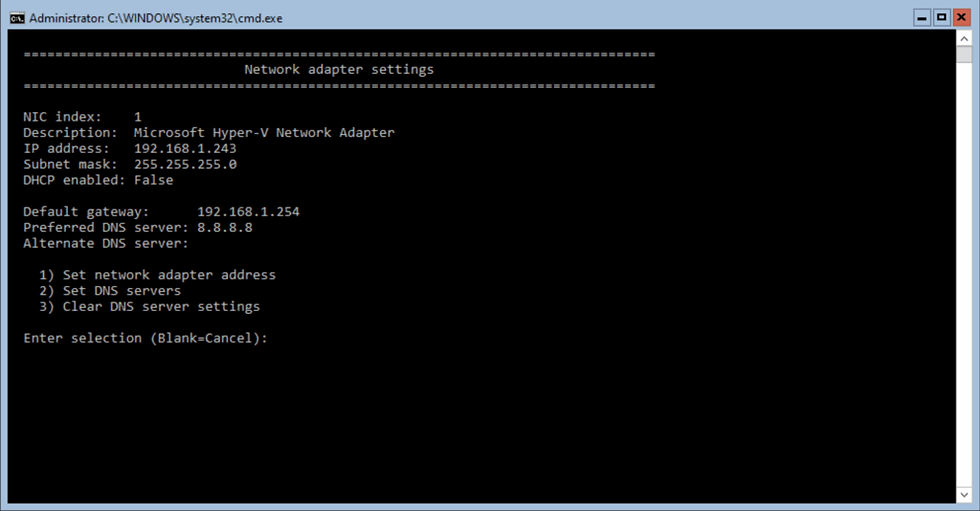
Everything looks correct.
Using PowerShell
You can also view DNS settings using PowerShell on Windows Server 2022.
Get-DnsClientServerAddress

Those addresses match the DNS servers used by my domain controllers. To change to Google’s DNS server:
Set-DnsClientServerAddress -InterfaceIndex 3 -ServerAddresses 8.8.8.8

I ran Get-DnsClientServerAddress again to confirm the change was successful.
Frequently asked questions
How do I reset DNS settings back to automatic?
You can select “Obtain DNS server address automatically” in your adapter’s IPv4 properties or run PowerShell with DHCP parameters on the correct interface.
Will changing DNS make my internet faster?
In some cases, yes. Public DNS providers may respond more quickly than ISP-provided DNS servers. Results vary based on network location.
Why can’t I change DNS in Windows 10?
This may happen if your organization manages device settings, if you lack administrator rights, or if your network adapter has restrictions applied by group policy.
Does using Google DNS or Cloudflare DNS increase privacy?
These providers may offer better privacy controls than ISP DNS, but they still receive your DNS queries. You should review each provider’s privacy policy.
Is it safe to change DNS on my computer?
Yes, changing DNS is safe. If you enter an incorrect DNS server address, domain names may not resolve, but you can revert to automatic DNS at any time.
Petri.

Comments